Category Archives: Chicken Yard

New place to buy and sell

When I was on Craigslist, I found a chicken swap site.  It has been great.  I have sold a few chickens and chicks and some fertilized Silkie eggs.  I am getting more eggs ready to sell, too.  Two more people want some.  I am excited about selling the eggs because I like to think of all the baby chicks that will be hatched out.

The bad part about this site is that it makes me want to buy more chickens.  I keep seeing so many pretty chickens that I have never heard of and wish I had.  But, I have to finish up what I have started before I start adding more yards and chickens.

Since getting rid of the eleven roosters, I am going to put the Americauna and Barred Rock hens together in my largest chicken yard (approximately 60 ft x 60ft) which is presently the BR yard.  I let them free range on about 1/2 acre.  I have 11 Americauna and 11 BR hens so that is not too many to have together.  I know they will peck and fight a little at first to get the pecking order but hopefully, they will adjust.  If I see one is being really aggressive, then I separate the mean one from the group for a little while (in a cage).  So far, that has worked for me.  Basically, I will put her in “time-out.”  I told you they are like kids to me, didn’t I?

The Americauna yard has two nice, large trees (Maple and Pop Corn, not the real name).  Since it opens into my Silkie yard, I can just open the gate and let the Silkies run in there for relief from the sun.  Their yard is newer and doesn’t have the shade that the two trees offer to the Americaunas.  I let the Americaunas free range into another part of my two acres so they don’t usually stay and enjoy the trees in the hot part of the day anyway.

So, that’s my new plan…move the Americaunas to the BR yard and open the Americauna yard to the Silkies.  I swear, the Silkies are definitely creatures of habit and I have a hard time getting them to move into new areas.  I guess I will have to throw little pieces of bread to lure them into the larger shaded yard. That I should video….
Bread ties come in handy

I started saving my bread ties a couple months ago.  I didn’t know exactly what I would do with them but they just looked like something I could re-use.

I was out in the chicken yard today moving chicks into another yard.   I needed to attach the smaller fence that is two feet tall (and has smaller holes) to the fence that goes around the chicken yard.  I had run out of the ties that I usually use which by the way, are a pain in the butt.  The name of them escapes me right now but it will come to me.  They are plastic and come in different colors and sizes.  You put one end thru the other and it catches if you have put it in on the right side…..which I do not do quite often.

Well, I thought of my bread ties and they worked perfectly.   I attached the one short soft fence to the outside fence quickly with a lot less cussing under my breath.

So now I am putting all my bread ties in an empty peanut butter jar with a lid and putting them in the shed with the tools and chicken supplies.  And best of all, they are free.

Finally, a buff-colored Silkie chick

I have been putting the eggs from my buff-colored hens under any hen that is broody and not getting any chicks.  Well, I had one chick hatch out yesterday and I am pretty sure she looks like she will be buff-colored.  It is sometimes hard to tell when they are first hatched out.  I realized a couple days ago that one of the chicks hatched out in April is actually going to be buff-colored, too.  I am thrilled.

Lacy is a white Silkie that I got back in December, along with her week old chick.  Her baby chick stuck by her for months and is now full grown and laying eggs herself.  Lacy B (baby) is her name.

Lacy has gone broody twice since December and hatched out chicks for me.  She still has five more eggs under her but none hatched out today.  I put them under her at various times for about a week so I don’t know if more will hatch or not.  Hope so.

Today, I was moving the chicks around and they were not happy about it.  They were making all kinds of noises and the Light Blue Silkie rooster decided to attack me.  He jumped at my legs.  I had on shorts so I got a slight scratch on my leg.  That was the first time I have ever seen any aggression from the roosters.  The momma’s get very aggravated when I try to look under them to see if the eggs have hatched or if I come near their newly hatched chicks but this was a first for me.   Then the Black or Grey Silkie rooster (didn’t really see which one as I had my hands full just trying to carry the three chicks) decided to try to jump me a few minutes later when I was moving more chickens.

I was glad I decided to move the chicks because there were so many ants in the one yard.  The smaller chicks are still eating starter food and they get it everywhere so it has attracted a lot of ants.  Usually before I put chickens in a small yard, I rake it really good to get any old poop out of it.  Sometimes I hose the area down, too.  After it is dry, I sprinkle ant killer granules LIGHTLY in the area.  I make sure there is not any piles of ant granules.  Sometimes I even rake it a little more just so its not so obvious to the chickens.  Then I spread hay on the ground lightly.   This seems to be working for me.  I just make sure there is plenty of food and water for them so they don’t have to start scratching the ground to look for food for awhile.

Well, the chicks are all settled down in their new yards but I still have 7 chicks in my second tub.  They are barely one week old and I don’t want to put them outside yet.   I will get the area that I cleaned out today ready for them in the near future.  Fortunately, the 4×8 cage is moveable so it will be a little less work.

I don’t know how many ant bites I got today.  I am not allergic to the bites but I have noticed that if I get too many at one time, I don’t feel real well.  I bet I got fifteen or twenty today.  Dang it.  I had to trim my trees in my chicken yards, too because every time I went under them or I brushed against one, I ended up with an ant on my blouse or arms.  They must be after me.  I do run around the yard putting ant killer granules out when my chickens are not free ranging so they must have spread the word.  lol

So my count now is 121 chickens.  I really am going to sell some in the near future.  I was out there looking closely at them today, determining hens and roosters.  I know I have two extra black Silkie roosters.  I have the cutest little grey Silkie…I will add a picture tomorrow if I can.  It grey and has white under it’s neck area and it is so fat and fluffy looking.

I was talking to my husband out in the chicken yard commenting on how this one is so cute and how much I like that one.  My husband said, “So which one don’t you like?”  He knew my answer.  NONE.  Though I do get aggravated when one chicken seems to be picking on another one.

Chicken houses

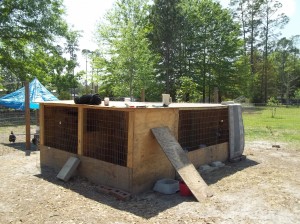
I wanted to share with you how easy it is to enlarge your chicken house if you make this simple dugout.  See, once you get the chicken bug, you will get more chickens and then realize you don’t have enough room for them all.  Living in Florida, I don’t really have to worry about the weather so I don’t have to close the houses up.    When the weather gets cold and I have smaller chicks/chickens, I run extension cords and use heat lamps.

The main thing you will need to buy is three 4×8 sheets of wood and nine 2x4s.  Eight of the 2×4’s will be used to make a frame and the nineth one will be used to run down the center of the roof to keep it from buckling or bending or drooping.

So, to build the first chicken house which is actually on the back side of this picture and you cannot see it, we just built a 4×8 structure with one side totally open.   You make a 4 foot tall by 8 foot long structure, similar to a dugout.  When we cut the 4×8 sheet of wood into two pieces (for the sides), we laid them on top of each other and put a hole thru both boards so we could run a pole thru each hole for perching and it would be level.

As we got more chickens, we needed more shelter.  We then used the back side of the existing chicken house to save money and space in the yard.    We added 2×4 boards to the back board and worked out adding the two sides first and making the frame to add the roof.  It was all very simple.  It saved us the cost of the board (15 bucks).  That is the one you see on the right of the picture.  We put a board across the bottom because we use this side as a nursery for our small chickens/chicks and we don’t want them to get out.  Then I just put welded wire fencing across the front to keep them in.  The fencing is easy to mold  to the structure  so I only tacked one side down and bent the other around the outside of the structure for easy access.

Then I had two chickens go broody and I wanted to separate them from the other chickens.  The other chickens kept laying eggs in the same nest as the broody hens.  You can just mark the eggs with an X showing what eggs you want to leave under the momma hen and then take the rest out daily.  I don’t like doing this because the momma gets so mad when you disturb her.  After she has enough eggs under her, I move her and her eggs.   She gets mad and gets off the eggs for a little while but eventually settles back down on the eggs.

We needed a place for the broody hens so we decided to enlarge the houses by adding on to the side of the two chicken houses already built.  The two chicken houses were  8×8 and we added the chicken house on the end which now made the chicken houses 12ft x 8 ft.   Again saving us 15 bucks.  Again, put a board across the front bottom to keep the baby chicks inside the 4×4 dugout.  The welded fence across the front is not attached at all.  The concrete block in the center is holding the fence to the structure and I just bent the fence around the corners of the outside of the structure.

Also, when I made this 4×8 into two 4×4 section, I  put the center wall only half way up.  It is a temporary wall that I can remove and make into the space a 4×8 again.

I am raising Silkie chickens and will be separating them by color when I intend to incubate the eggs and get pure white, black, light blue, dark blue, splash, and grey chicks.  I really enjoy it when the hens do the sitting instead of incubating.  I like to see the momma hens with their babies running around.    These 4×8 dugouts will be ideal for putting a couple hens and rooster together for mating purposes.   The article I read said you should keep a rooster and hen together for at least 3 or 4 weeks in order to ensure that you get eggs fertilized by the rooster you have chosen.