Author Archives: frankie

About frankie

Maiden name is Farmer so I guess I am getting back to my roots. I love raising chickens and especially when the baby chicks are hatched out. I am a senior citizen and live with my husband in Florida. We live a quiet, peaceful life on our two acres with our one dog ( two dogs died past year and we miss them) and various amounts of chickens. I have had up to 120 chickens but now at about 45. That seems to be a good number for us. Feed and medicines can be expensive and you certainly don't get enough money for the eggs to pay for the feed. Selling the chickens and chicks helps, too. It is not a business for me though....they are my pets. I have three terrific grown children that I am very proud of and two wonderful granddaughters. With my children living in DC, Texas and North Carolina, we will be doing a lot of traveling now that my husband has retired from 40 years with civil service. If you are new to raising chickens, I hope I can tell you amusing stories as well as give you information that will make your experience with chickens fun. I sometimes feel like raising chickens is like raising kids. Some days it is so rewarding and other days, it is a darn lot of work. I am very much interested in making life simple and trying to be self-sufficient as much as I can. I enjoy grocery shopping and getting the best prices as well as stocking up on food and household items. I also love to go to the thrift stores. I have bought numerous pairs of name brand jeans for $3. It just makes sense to be thrifty and since we have the time to look around and find bargains, that is what we chose to do. It also gives us something to do. We planted our first garden this year. Though it is small (squash, watermelons, sweet potatoes and tomatoes), it is a start. My daughter bought me a dehydrator for Mother's Day and we are looking into buying an upright freezer. Those things were needed before we plant a bigger garden. Hope you enjoy my blog....God bless.

Building a simple 4×4 chicken house for $36

My husband and I recently built a small “dug-out” chicken house for three hens and a rooster and I thought I would share how we built it.  It is a quick and easy way to make some shelter for your chickens.

You will need two 4×8 sheets of plywood ( $12 each), six 2×4’s ($2 each),  screws, drill, saw, saw horses and something to make a hole for the perching poles.  My husband has this circular saw looking thing that attaches to his drill that is probably and inch and a half in diameter.

The two sheets of plywood need to be cut into, making  four 4×4 sheets.  Two of the pieces will be the sides and one for the roof and one for the back of the house.  You will need to put two of the boards together and make at least one hole to go thru both boards in exactly the same place to be able to put a perching rod up.  If you have smaller chickens like Silkies,  I would put the holes in the bottom at the back of the house about 2 feet off the ground, about half way up the board and only a foot from the back wall.
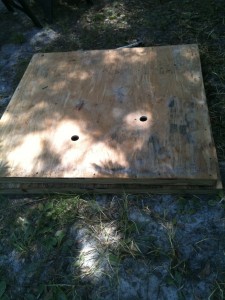
This picture shows the 4×4 with the holes cut thru both sheets.  To attach the 2x4s, we line the two  2x4s (approximately 48 inches) up on the left and right and then I sit on the board to keep it from moving while my husband adds the screws.  Then we add the other two 2×4 (approximately 40 inches) which are shorter to frame out the interior of the board.   Do this to both side pieces.

Then I painted the exterior of all four 4x4s.  If you want to make the house blend in with the surroundings, I would suggest a forest green or a brown.  I already had some antique white paint so that’s what I used.
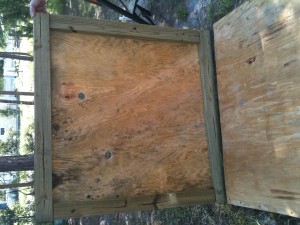
We have moved the four panels of 4x4s into the chicken yard now.  Our fence was already up and it was going to be difficult to move the whole house so we did the majority of the work (cutting and attaching the 2x4s)  in the shade near our house.   As you can see, we put the back panel up to the side and then screwed the back panel on to the 2×4 on the side.  Then we added the other side panel and again attached the back panel to it also.  Definitely need two people for this part.This is how it looks with the sides and back together.  It stands alone.  Yay.  You will need to add a 2×4 at the top and bottom of the back board.
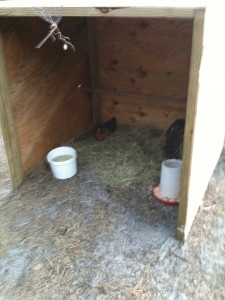
Match up the back corners first and attach screws along the back.  Then straighten the sides to line up with the roof and attach with screws. Then add a 2×4 along the top front so you will have something to screw the top to and you might want to add one on the bottom front.  I did not because I want to be able to rake the chicken poo and straw out easier.  Instead, I took the last 2×4 and attached it to the (inside)  middle of the top of the roof to keep it from warping.

We already had a pole for perching.  We added a crate with hay in it for the laying hens and a feeder and water.  The yard is just 8×10 foot, I would guess.  I also have some netting over the top which I purchases at Lowes for about 8 bucks.  We don’t have a lot of predators that are four-footed around her but the chicken hawks and owls will sweep down and take your small chickens.

If you need to close your chickens in at night, it is easy to close in the front with boards or fencing.  I will probably add a 2×4 foot piece of plywood at the front top to help keep the rain out.  You can also make your roof slanted to make the water run off.

My husband keeps saying he wants to build the houses at least 6 feet tall so we don’t have to bend down to get into the houses but when you are only reaching in a couple feet to retrieve the eggs, it doesn’t bother me.  You might want to get the crate off the ground and attach it to the back wall.  I don’t really see a lot of benefit in doing that though because I like everything moveable.  You don’t really have to have a nest for them because they will lay back in the corner of the house without a nest, unfortunately.

My husband and I are not carpenters by any means and there might be a lot better way to make a small house but this is really cheap and is almost instant protection from the weather.  You can also lean a piece of wood to the side of the house and lay a brick on the ground at the base of the wood to keep the board from moving.  This gives you a place to put the food and water and it is not in the house.  The corn gets wet and it smells really bad.  lol

I hope you can figure out my system to build the house.  It is my first attempt at trying to explain how to build something step-by-step.

Good luck and I hope you enjoy your chickens as much as I enjoy mine.
Hens fighting over chicks

It is very important to keep your sitting hen away from other chickens.   Unfortunately, I learned the hard way.

I miscalculated the hatch date on my white Silkie’s eggs and had another hen and her 4 month old chick in the same yard.   I usually go outside pretty much when it is daylight just to make sure everyone is still there and no one is in a distressed situation.    But, my husband had the day off and we slept-in and then ate breakfast.

When I checked on my sitting hen, she had hatched out three chicks and two of them were about 15 inches from her nest and were dead.  I suspect there was a fight over the chicks.  The same thing happened to my neighbor the very same day.  I was so upset to find the perfectly healthy chicks dead.

Sometimes you make decisions that end up biting you in the butt.  I only have four adult white Silkies so I was trying to keep them in a separate yard to ensure the eggs would be fertilized only by my white rooster.  When the one white Silkie hen became broody, I moved the rooster and the other two hens out into the large Silkie yard after I  moved the other roosters out.

But, the two white hens didn’t seem to adjust well after two days.  They were sleeping in the middle of the yard instead of going into the house with the other hens.  They were also being picked on by the other hens.  The whole pecking order thing, I guess.  So,  I gave in and put them back into the pen with the broody hen thinking there was still a few days before the chicks would hatch.  I was thinking “I will think about it tomorrow” like Scarlett O’Hara in Gone with the Wind.

So…….be sure and separate your broody hen with her eggs from your other hens.  If they fight over the babies, there is a good chance the babies will get injured or die.   I knew Silkie hens would steal each others eggs and baby chicks because they are excellent mothers but I had no idea they would want them so badly that the chick would end up getting killed.  So sad.

Broody Hens Sitting Again

It is very exciting when summer hits and all the hens decide they want babies.  I have four hens sitting right now.  Two white Silkies, one tricolor Silkie and one Barred Rock.

One of my black Silkies has four two-week old chicks.  I put eggs under her so she ended up with 3 white chicks and one dark one with a little white on it’s head.

I like to separate my sitting hen from the other chickens so no other eggs get deposited with the ones I want hatched.  If you can’t do this, then mark the eggs you want hatched with a X of them and then take the others out daily.  You have to lift the hen to get the eggs but she gets use to that pretty quickly.  I lift by the tail to avoid getting pecked.

The hen only gets off the eggs once or twice a day to eat, drink and poop and it seems the hen would be less likely to get up if there are a bunch of hens that could take over her eggs.  I have actually had two mixed Silkie hens sitting on eggs (on the ground, much to my dismay) and they kept stealing each others eggs.  One hen would wind up with 8 eggs and the other 2.   I have heard they will steal each others chicks, too.  Silkies are excellent mothers so I could see that happening.  That’s why I am enjoying my two maternity ward houses so much.

I always put about six eggs under the Silkies as they are small chickens and 8 or so under the larger hens.  I don’t usually do the candling to ensure the eggs are growing into chicks.  The mom will sometimes push the eggs out that aren’t any good…or so that has been my experience.  If you don’t check the eggs though, you can get some bad smells.

I like to let the hen keep the chicks for about 4 to 8 weeks.  If  I have other chicks that I can group together, then I take all the chicks away from the Moms and put them in a small safe yard or pen.   I never let one chick be alone.  If I don’t have other chicks then I let the Mom keep her one chick until it is pretty much full grown.  So far, that has only happened once.

My neighbor lets her hen and chicks roam around in the yard and though it is more natural, it is far from safe.  She had about four or five chicks hatch out a month or so ago and none of them are left.  If the chicken hawks don’t get them, the owls will.    It breaks my heart.

I have two large dogs that stay outside at night and their yard is very close to the chicken yards.  The dog yard is actually on the side of my two acres that is closest to the woods which is where I imagine most four-legged predators would live.   I am sure their barking has discouraged animals from feasting on my chickens.

I believe I have 86 chicks/chickens now.  I actually sold a few recently and gave away some roosters.  I have 18 Americauans, 14 Barred Rock and Barred Rock mix, and all the rest are Silkies with a few of them being Americauana/Silkie mix.   Some of the prettiest ones are the Am/Silkie mix.  Small and colorful with feathered legs make them special.

Two months ago, I hatched out Barred Rock (brown) eggs in the incubator.  Well, I forgot that I had a couple Americuana roosters running in the yard so I got some mixed looking chickens.  I actually like having the different colored chickens.  It sure makes it easier to tell them apart.   Of course, then I name them.  Named chickens seldom leave my property.  It would be like selling one of your children.

My husband is so good to me and he knows almost every weekend I have some kind of chicken project.  If it’s not fencing, its building houses, or moving something in the yards.   Then there are trips to the feed store, flea market, Swap Meets or just picking up chicks/chickens from Craigslist.  If your kids are grown and you have “Empty Nest Syndrome,” chickens will keep you busy and they start to feel important to you like your dog/cat and so on.

Well, we are going to be building a 4×4 chicken house this weekend.  I will put a note up to remind me to take pictures of the various stages.  It is so easy and it makes quick, inexpensive housing for a few chickens.

Chicken houses

I wanted to share with you how easy it is to enlarge your chicken house if you make this simple dugout.  See, once you get the chicken bug, you will get more chickens and then realize you don’t have enough room for them all.  Living in Florida, I don’t really have to worry about the weather so I don’t have to close the houses up.    When the weather gets cold and I have smaller chicks/chickens, I run extension cords and use heat lamps.

The main thing you will need to buy is three 4×8 sheets of wood and nine 2x4s.  Eight of the 2×4’s will be used to make a frame and the nineth one will be used to run down the center of the roof to keep it from buckling or bending or drooping.

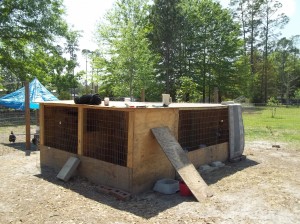
So, to build the first chicken house which is actually on the back side of this picture and you cannot see it, we just built a 4×8 structure with one side totally open.   You make a 4 foot tall by 8 foot long structure, similar to a dugout.  When we cut the 4×8 sheet of wood into two pieces (for the sides), we laid them on top of each other and put a hole thru both boards so we could run a pole thru each hole for perching and it would be level.

As we got more chickens, we needed more shelter.  We then used the back side of the existing chicken house to save money and space in the yard.    We added 2×4 boards to the back board and worked out adding the two sides first and making the frame to add the roof.  It was all very simple.  It saved us the cost of the board (15 bucks).  That is the one you see on the right of the picture.  We put a board across the bottom because we use this side as a nursery for our small chickens/chicks and we don’t want them to get out.  Then I just put welded wire fencing across the front to keep them in.  The fencing is easy to mold  to the structure  so I only tacked one side down and bent the other around the outside of the structure for easy access.

Then I had two chickens go broody and I wanted to separate them from the other chickens.  The other chickens kept laying eggs in the same nest as the broody hens.  You can just mark the eggs with an X showing what eggs you want to leave under the momma hen and then take the rest out daily.  I don’t like doing this because the momma gets so mad when you disturb her.  After she has enough eggs under her, I move her and her eggs.   She gets mad and gets off the eggs for a little while but eventually settles back down on the eggs.

We needed a place for the broody hens so we decided to enlarge the houses by adding on to the side of the two chicken houses already built.  The two chicken houses were  8×8 and we added the chicken house on the end which now made the chicken houses 12ft x 8 ft.   Again saving us 15 bucks.  Again, put a board across the front bottom to keep the baby chicks inside the 4×4 dugout.  The welded fence across the front is not attached at all.  The concrete block in the center is holding the fence to the structure and I just bent the fence around the corners of the outside of the structure.

Also, when I made this 4×8 into two 4×4 section, I  put the center wall only half way up.  It is a temporary wall that I can remove and make into the space a 4×8 again.

I am raising Silkie chickens and will be separating them by color when I intend to incubate the eggs and get pure white, black, light blue, dark blue, splash, and grey chicks.  I really enjoy it when the hens do the sitting instead of incubating.  I like to see the momma hens with their babies running around.    These 4×8 dugouts will be ideal for putting a couple hens and rooster together for mating purposes.   The article I read said you should keep a rooster and hen together for at least 3 or 4 weeks in order to ensure that you get eggs fertilized by the rooster you have chosen.